How to Draw Anime Feet: A Step-by-Step Guide by Japanese Pro Artists
If your feet keep turning into flat paddles or a row of identical toes, this is the fix. Below are the rules from a Japanese drawing-technique book, redrawn as clean line art: the proportions first, then the same block-by-block method from above, from the front and from the inner side.
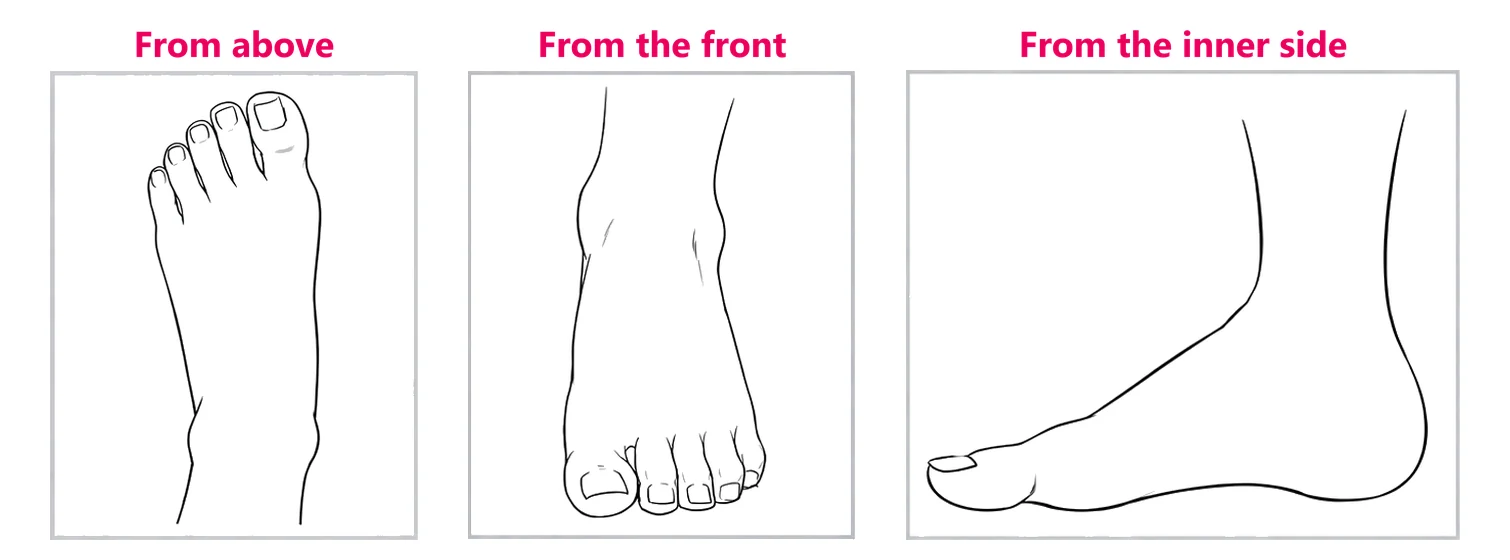 Construction study
The four stages at a glance
 01
 02
 03
 04
Step 01 · Proportions and shape
How long should an anime foot be?
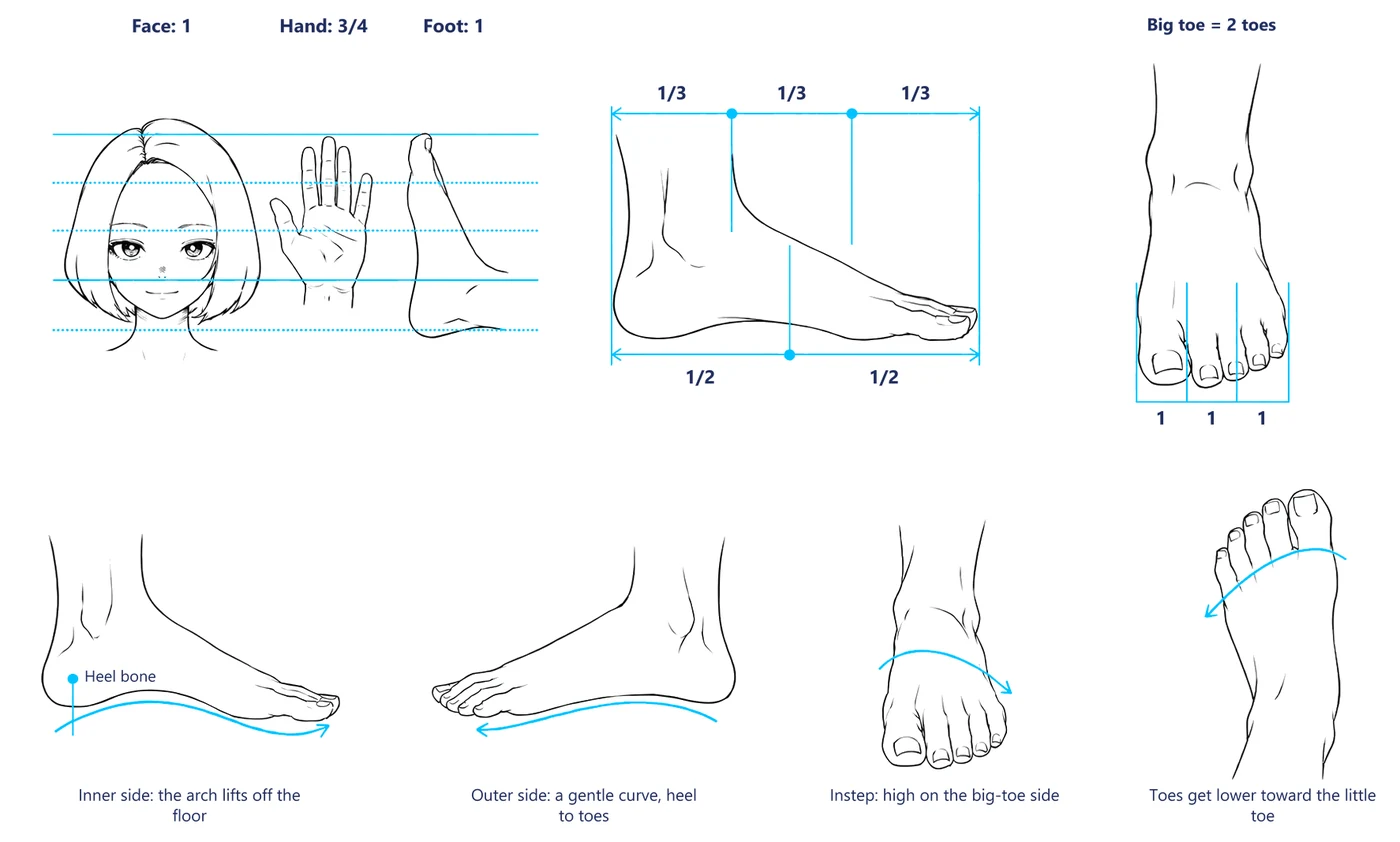
About as long as the face, with the big toe as wide as two small toes.It varies from person to person, but the foot and the face come out roughly the same length, and the hand is about three-quarters of that. From the side, the front of the ankle sits about a third of the way in from the heel. From above, the big toe takes up as much width as two of the other toes.
Now the shape. The heel and the big toe's second joint stick out, and the arch floats up between them. The tip of the big toe tilts up a little. The outer side also curves gently from heel to toes. From the front, the instep is high on the big-toe side and drops toward the outside, and the toe tips (and the line where the toes start) get lower toward the little toe.
Construction study
Step 02 · From above
How do you draw a foot from above, step by step?
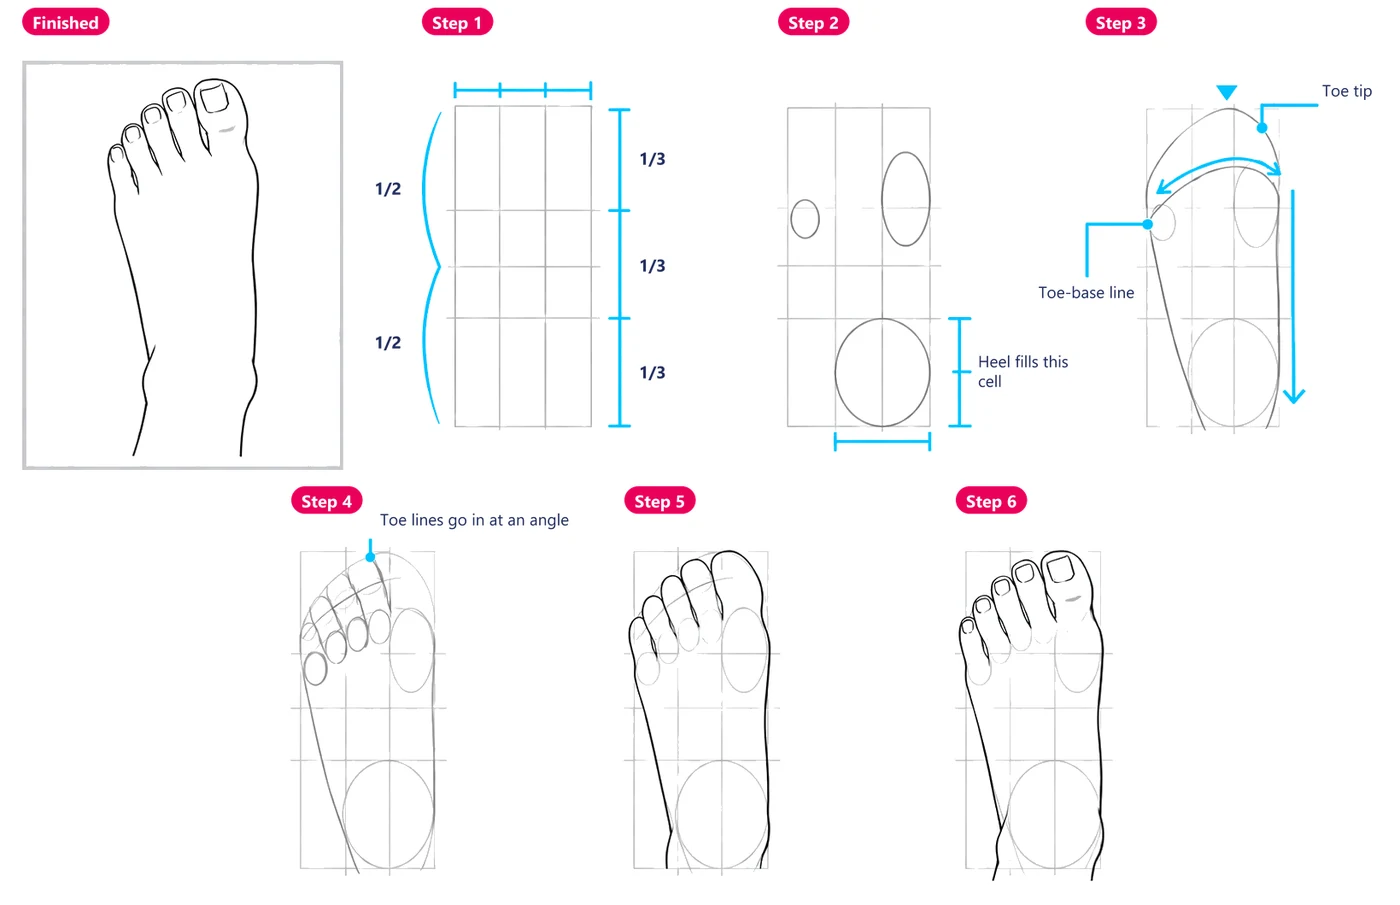
Box it, mark the big-toe joint, the little-toe joint and the heel, then connect them.You won't draw feet from this angle often, but it's the best one for learning the foot's shape and proportions, so start here. Draw a tall rectangle, split it in half top to bottom, then into thirds both ways. Place guides for the big toe's second joint, the little toe's third joint and the heel. The heel fills the bottom middle cell exactly.
Draw lines from the joints down to the heel. Then run an arc from joint to joint to set where the toes start, and the toe tip line above it. Split the toes: the big toe is about a third of the width, the others about a sixth each, and the toe lines go in at an angle. Put the second joints halfway along each toe and the third joints just under the toe-base line. Smooth the outline from joint to joint, keeping the joints slightly plump, and add the nails.
Construction study
Step 03 · From the front
How do you draw a foot from the front?
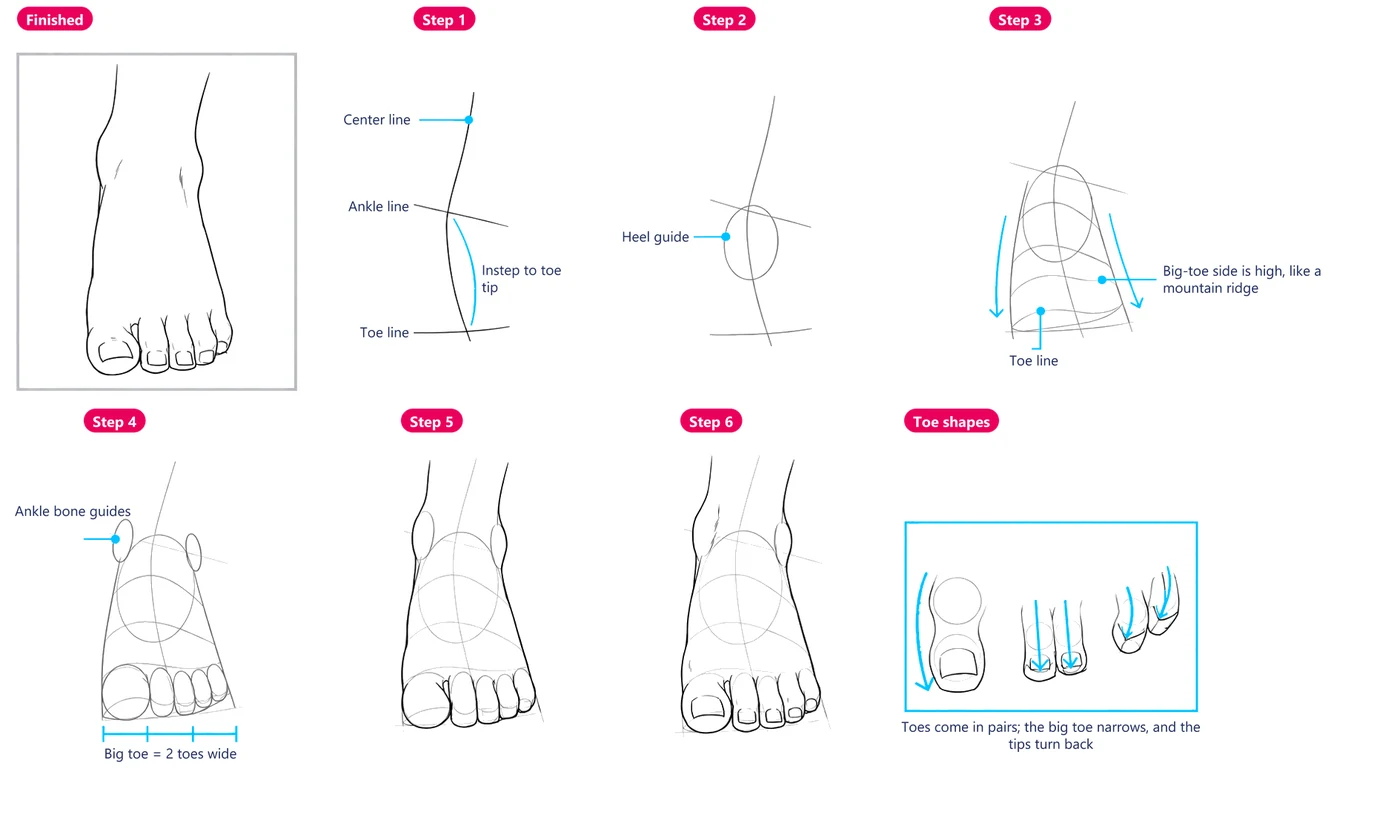
You usually look down at feet, so put the heel guide higher than the toes.Someone standing in front of you has their feet below your eye line, so you'll draw this slightly-from-above view more than any other. Start with a center line. The line from the ankle to the ankle bones and the line from the ankle bones to the toes meet at a slight bend. Then add an oval for the heel.
From the heel, draw two lines that spread out toward the toes, plus a guide line for the instep between them and the toe line. Think of the instep as a mountain ridge, highest on the big-toe side. Add guides for both ankle bones and the toes; two small toes equal one big toe in width. Toes come in pairs, the big toe narrows in the middle, and the tips turn back. Finish with the nails.
Construction study
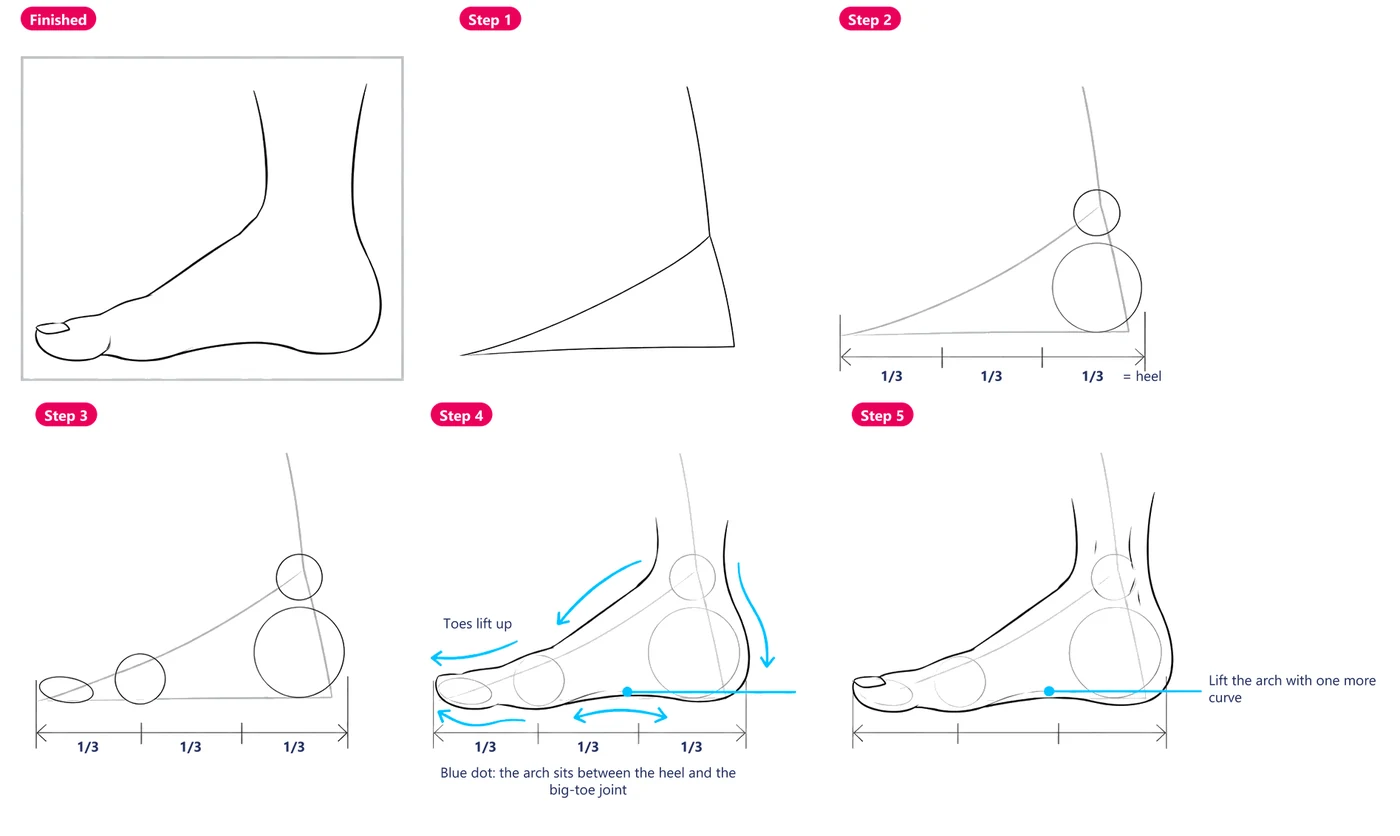
Step 04 · From the inner side
How do you draw the inner side of the foot?
Start from a triangle, then let the arch, the toes and the heel meet the floor smoothly.The inner side shows up all the time: a sumo or judo push off the big toe, someone lounging at home. Start with a guide shaped almost like an isosceles triangle, low at the toes and high at the instep. Split the bottom edge into thirds; the heel circle takes up one third. Add a smaller circle for the ankle bone, then guides for the tip of the big toe and its second joint.
Draw the outline with the flow of the instep, the toes lifting up, the round heel and the curve of the arch. The arch sits between the heel and the big toe's second joint. Finish with the nail and the bulge around the ankle bone, and add one more curve above the arch to lift it.
Construction study
From grid to finished foot
Every angle in this guide starts the same way: simple blocks and guides first, toes and nails last.
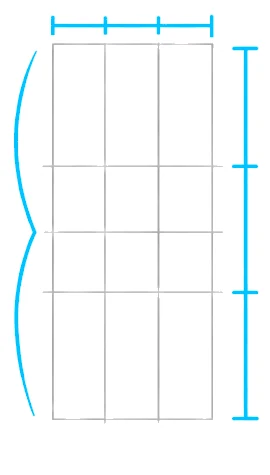
Step 1: a rectangle split into halves and thirds.
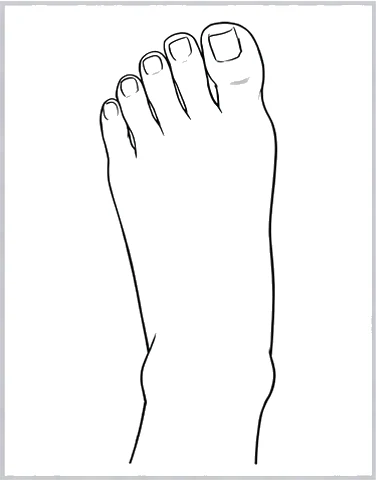
Finished: the same foot after six steps.
Where people usually get stuck
"My feet look like flat paddles."
Lift the arch off the floor between the heel and the big toe's second joint, and make the instep higher on the big-toe side.
"All my toes look the same."
Make the big toe as wide as two small toes, step the toe tips down toward the little toe, and draw the toes in pairs.
"My front-view foot looks flat."
Bend the center line slightly at the ankle bones and place the heel guide higher than the toes. You're usually looking down at feet.
Anime feet drawing FAQ
How long is an anime foot compared to the face?
About the same length. It varies from person to person, but the foot and the face are roughly equal, and the hand is about three-quarters of that.
Which angle should I practice feet from first?
From above. You won't draw it often, but it's the easiest way to learn the foot's shape and proportions. Then move on to the front view, which you'll use most because people's feet are usually below your eye line.
Where does the arch go on the inner side of the foot?
Between the heel and the big toe's second joint. It lifts off the floor in a curve, so draw it as an arc and add one more curve above it.
How do I get feedback on my feet drawings?
When you join an Anime Art Academy course, a professional Japanese artist gives you personal advice and draws red-line corrections directly on your drawing. There is no limit on how many times you can submit. The only rule: post one drawing at a time, and wait for your teacher's reply before posting the next.