How to Draw Happy Anime Expressions: A Step-by-Step Guide by Japanese Pro Artists
If your smiles look stiff, or every happy face you draw looks the same, this guide walks through a real Anime Art Academy lesson by a Japanese pro: why faces change, which muscles move, and three levels of happiness, from a quiet smile to full joy.
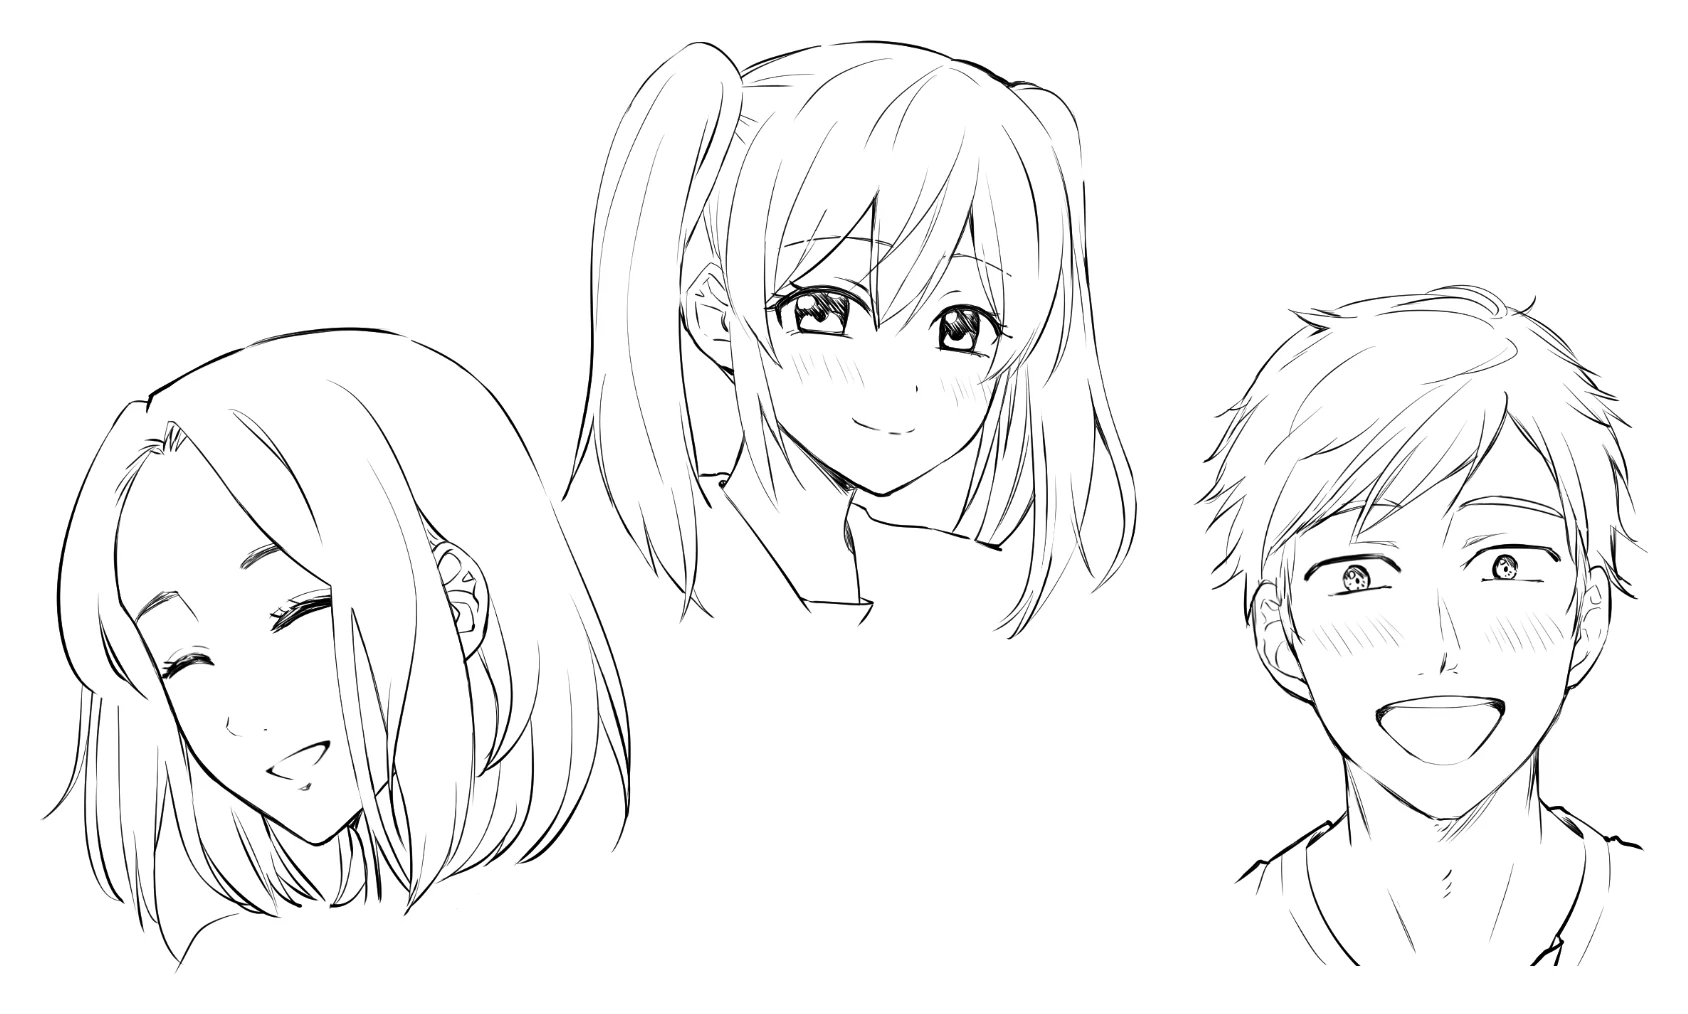 Real lesson material
The five stages at a glance
 01
 02
 03
 04
 05
Step 01 · Eyes, brows and mouth
What makes an anime expression easy to read?
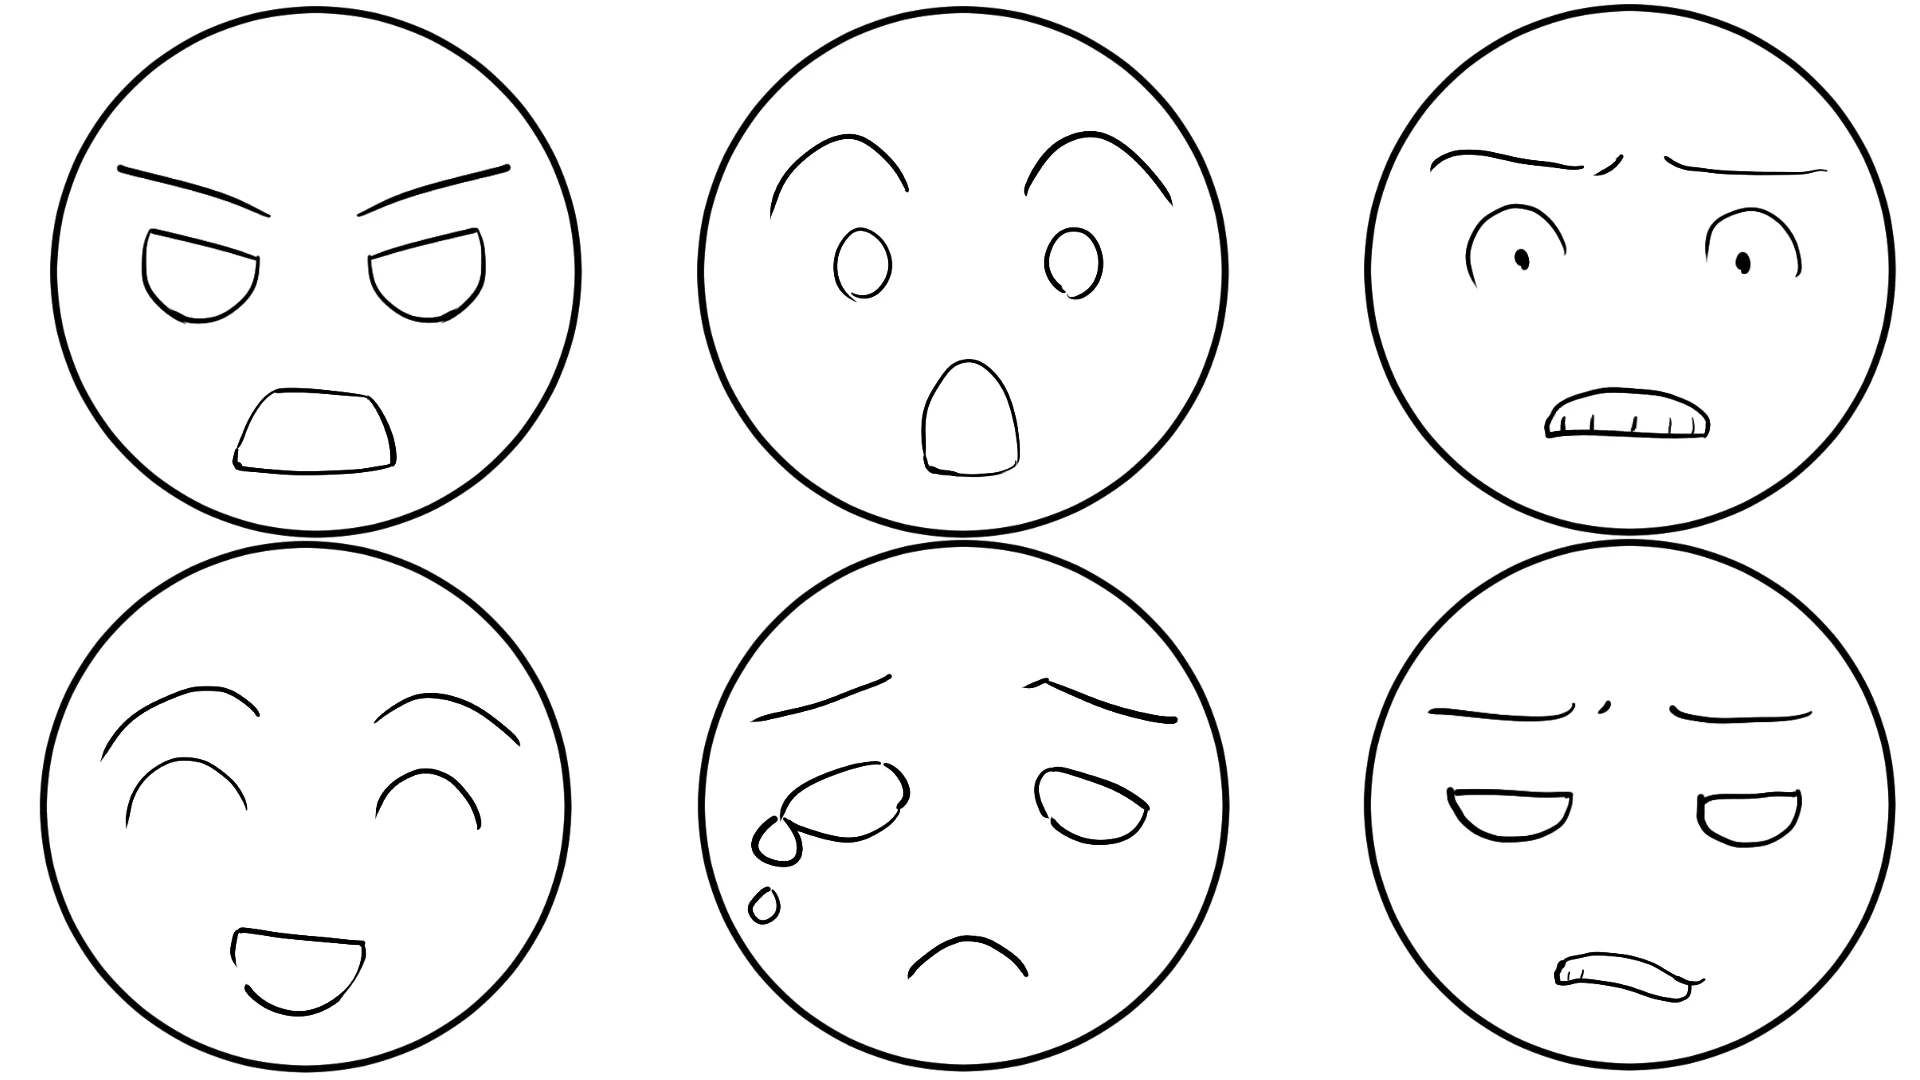
Three parts: the eyes, the eyebrows and the mouth.An expression shows up whenever the face muscles move. A feeling can do it, so can a change in temperature or how you feel physically, even the moment you take a bite of food. In the lesson, six faces drawn with very simple lines still read clearly as anger, surprise, fear, joy, sadness and disgust. Each one has eyes, eyebrows and a mouth, and that's enough.
Look at the happy face, bottom left. The brows sit higher, and both the brow tails and the outer corners of the eyes drop. The muscles under the eyes push up, so the eyes curve like crescent moons. That's why even a one-line, cartoon-simple eye still reads as a smile. The cheek muscles lift too, which raises the corners of the mouth.
Real lesson material
Step 02 · The smile muscles
Which face muscles move when a character smiles?
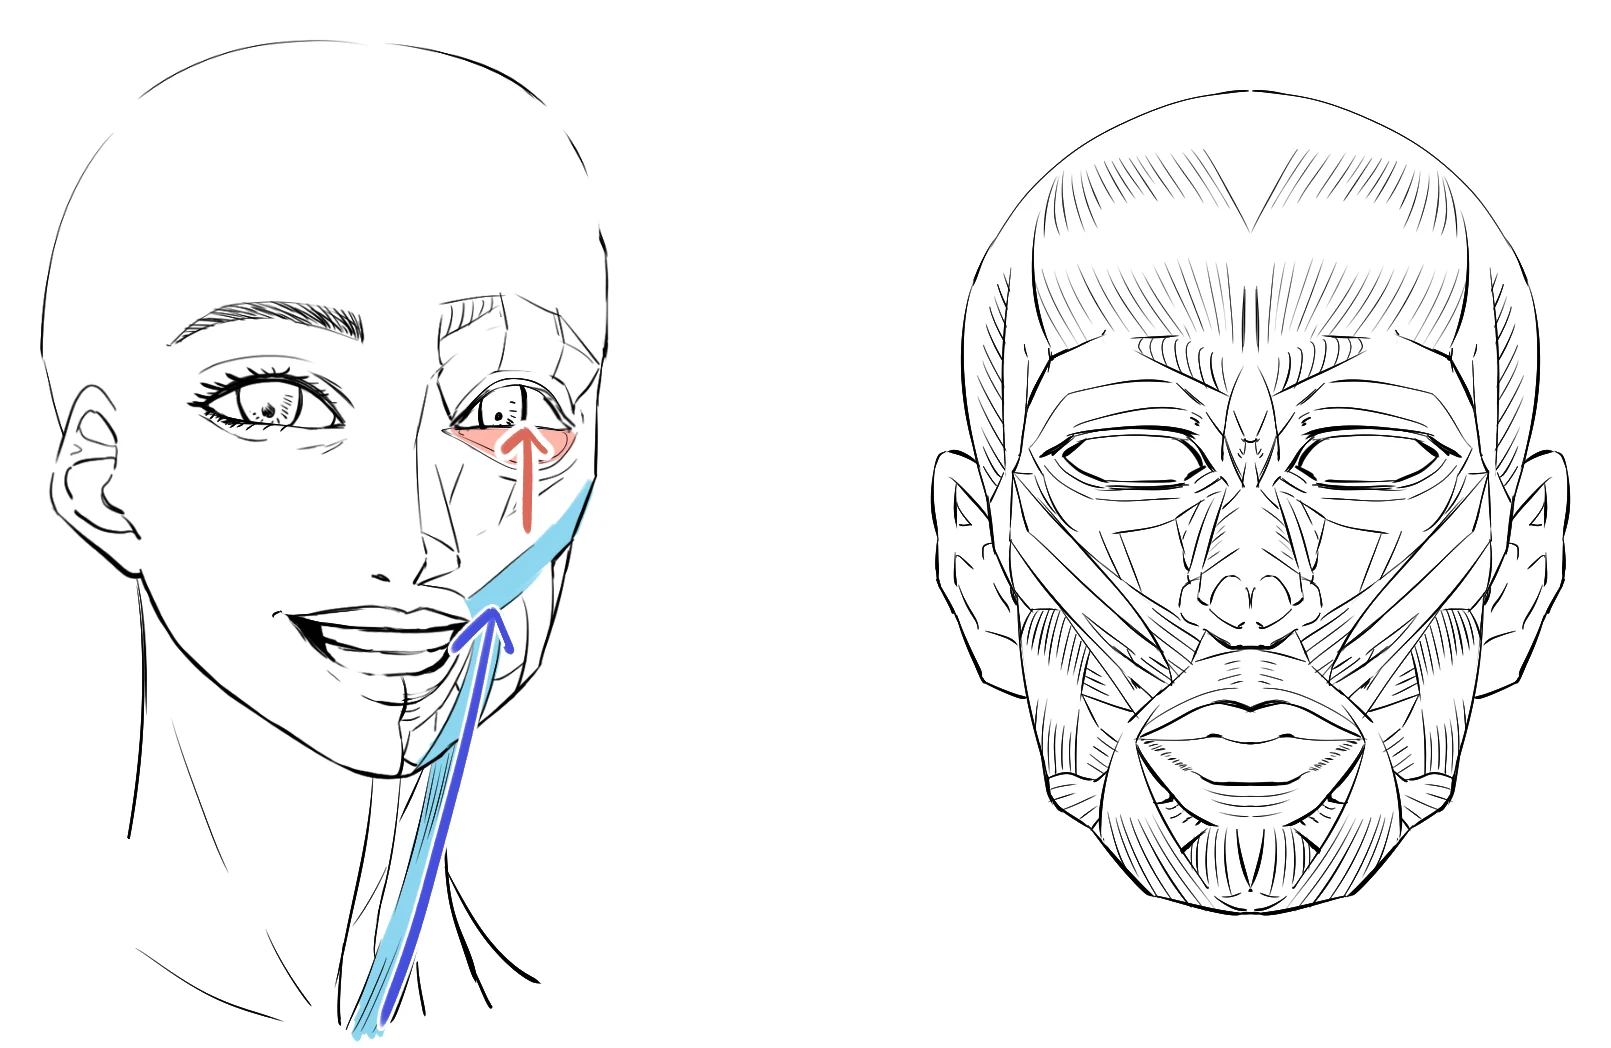
The lower part of the muscle around the eye, and the cheek muscle that pulls the mouth up.In this lesson image, one half of the face is drawn as skin and the other half as muscle. The red part is the lower half of the orbicularis oculi, the ring of muscle around the eye. When we smile, this part relaxes and the lower eyelid rises. That's the whole trick behind a smiling eye.
At the mouth, the muscles in blue do the work. The zygomaticus major gets pulled upward, the corners of the mouth rise, and you get a smiling mouth. So the two places to change your lines are the lower eyelid and the corners of the mouth.
Real lesson material
Step 03 · A gentle smile
How do you draw a gentle, quiet smile?
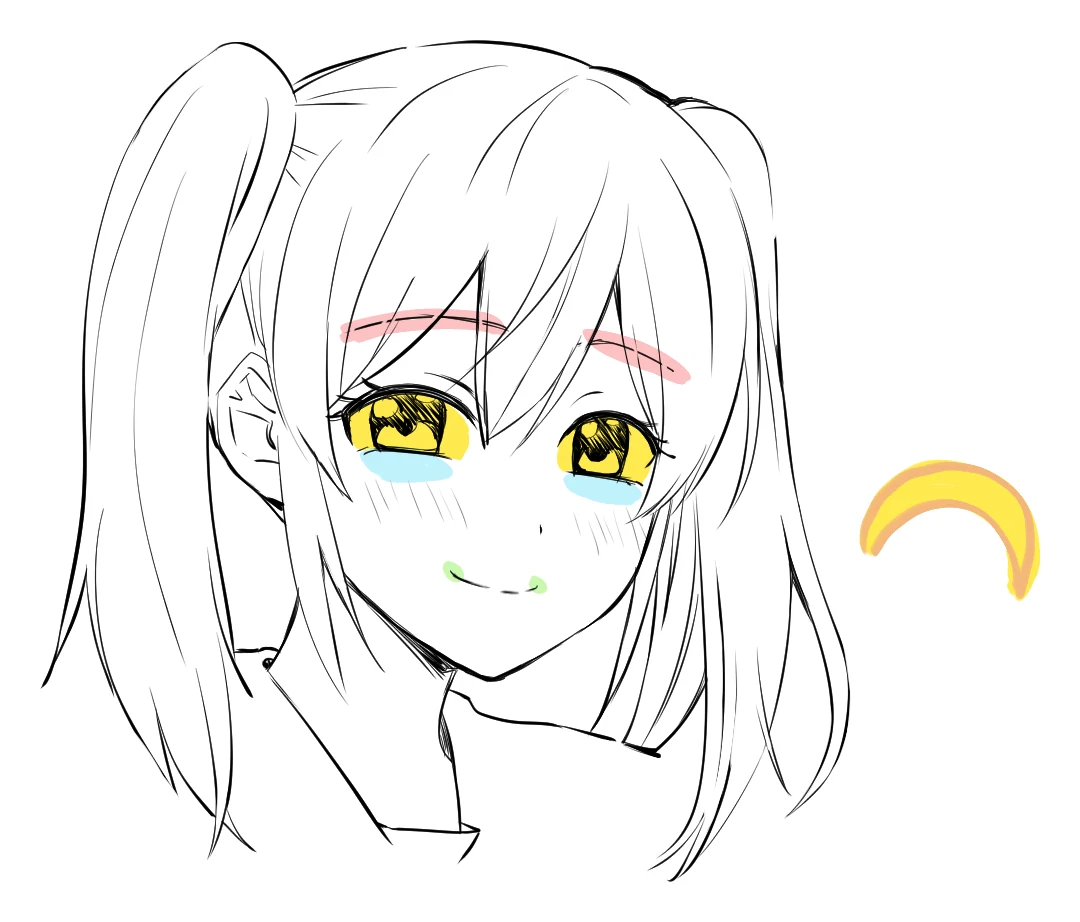
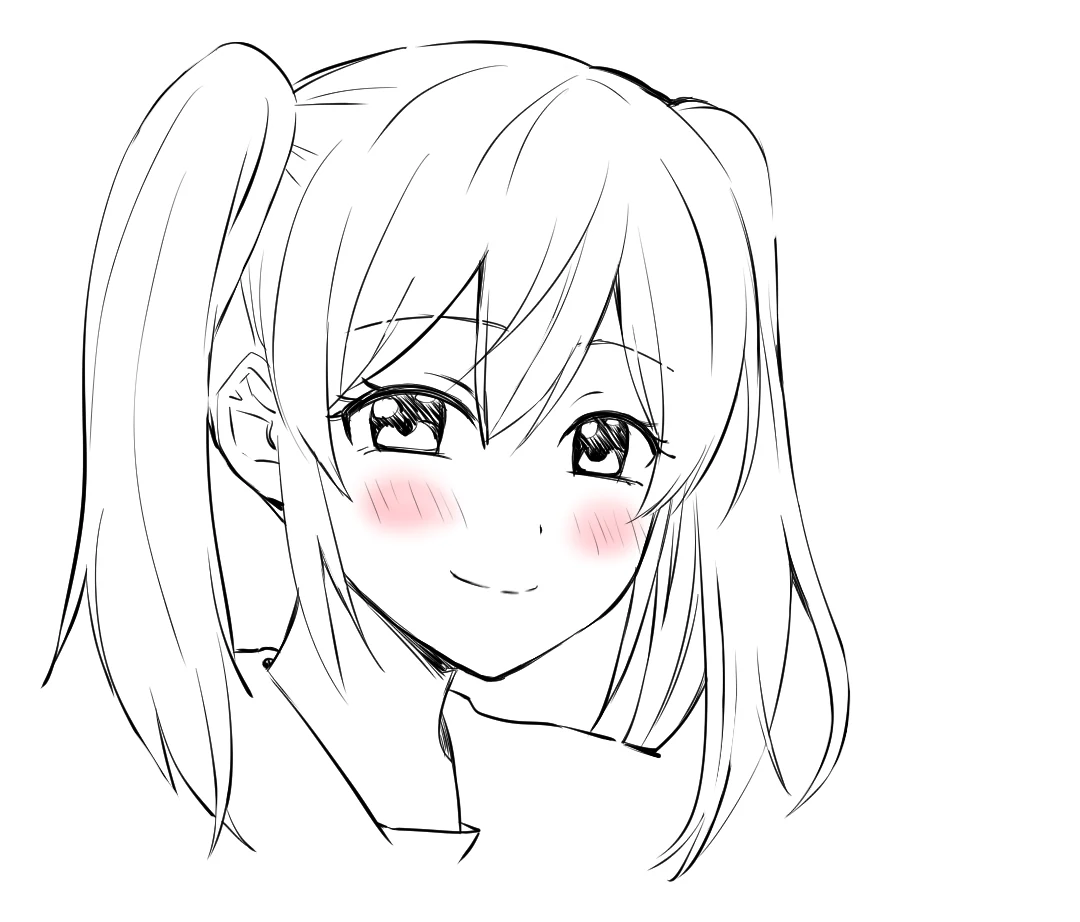
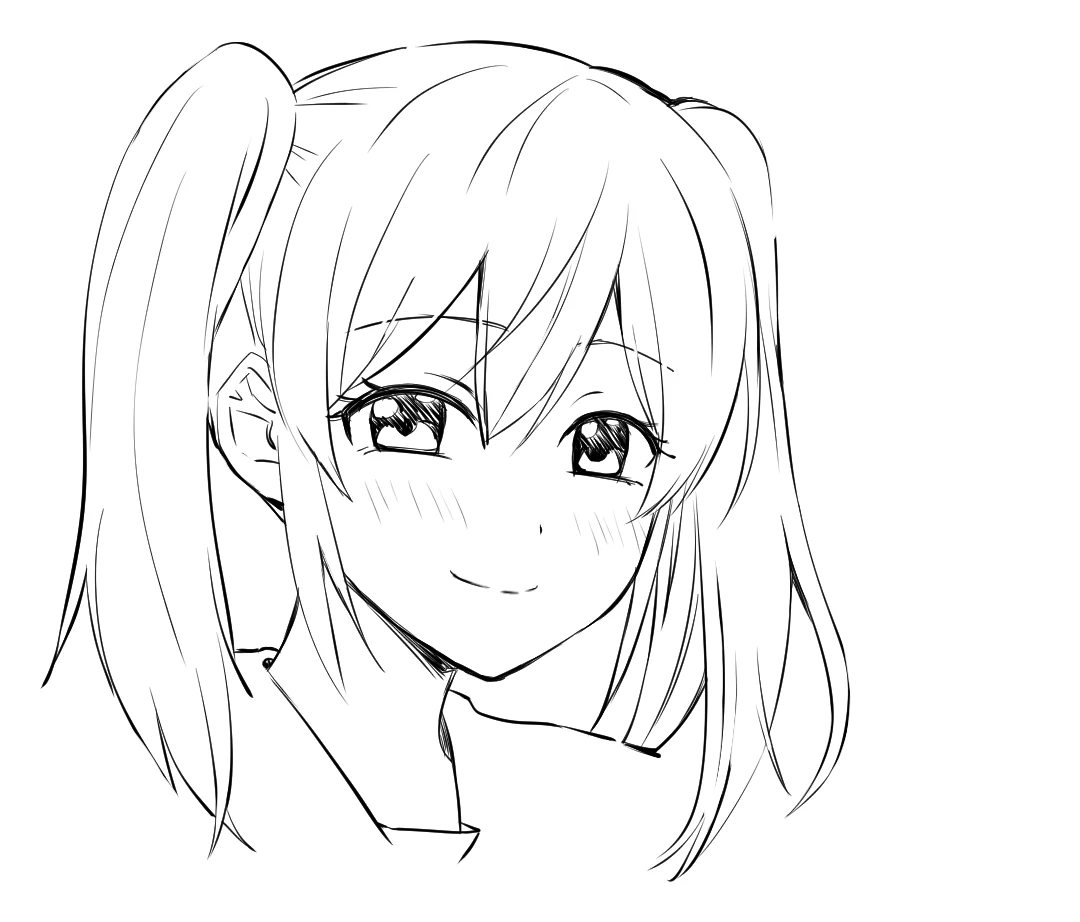
Lift the brows a little, raise the lower eyelids, curve the eyes into crescents, and tip the mouth corners up just slightly.This is joy turned down low. Red: the eyebrows sit a little higher than usual, and their tails drop. Blue: the lower eyelids rise above their usual spot. That alone starts the smile. Yellow: the eye becomes a crescent. If you remember one thing from this guide, make it "a laughing eye is a crescent moon." Green: the corners of the mouth go up just a touch. That's all a soft smile needs.
The diagonal lines on the cheeks show a blush. They come from the time when most manga were drawn in ink alone, and artists used hatching lines to show darker and lighter tones. A healthy flush of color makes the joy feel even stronger.
Real lesson material
 Real lesson material
Step 04 · A big smile
How do you make a smile look happier?
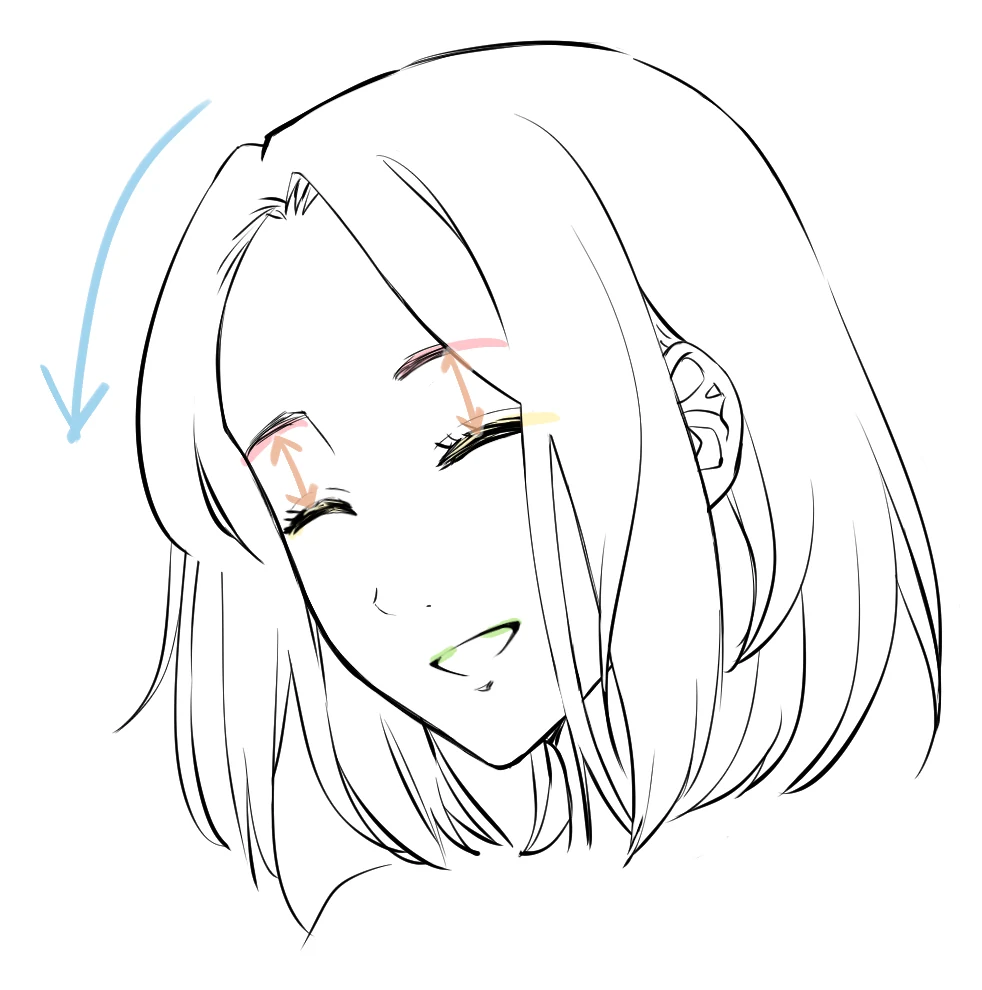
Raise the brows higher, keep the narrowed eyes crescent-shaped, and add movement to the neck.This face shows stronger joy than the gentle smile. In red, the eyebrows are lifted a lot, which pushes the feeling further. Even with the eyes squeezed nearly shut, drawing them as crescents keeps them reading as smiling eyes.
The blue arrow shows the neck moving, and that movement makes the feeling stronger. In green, the corners of the mouth still go up. As long as they do, you can change how far the mouth opens to show how strong the happiness is.
Real lesson material
Step 05 · Full joy
How do you draw a really excited, overjoyed face?
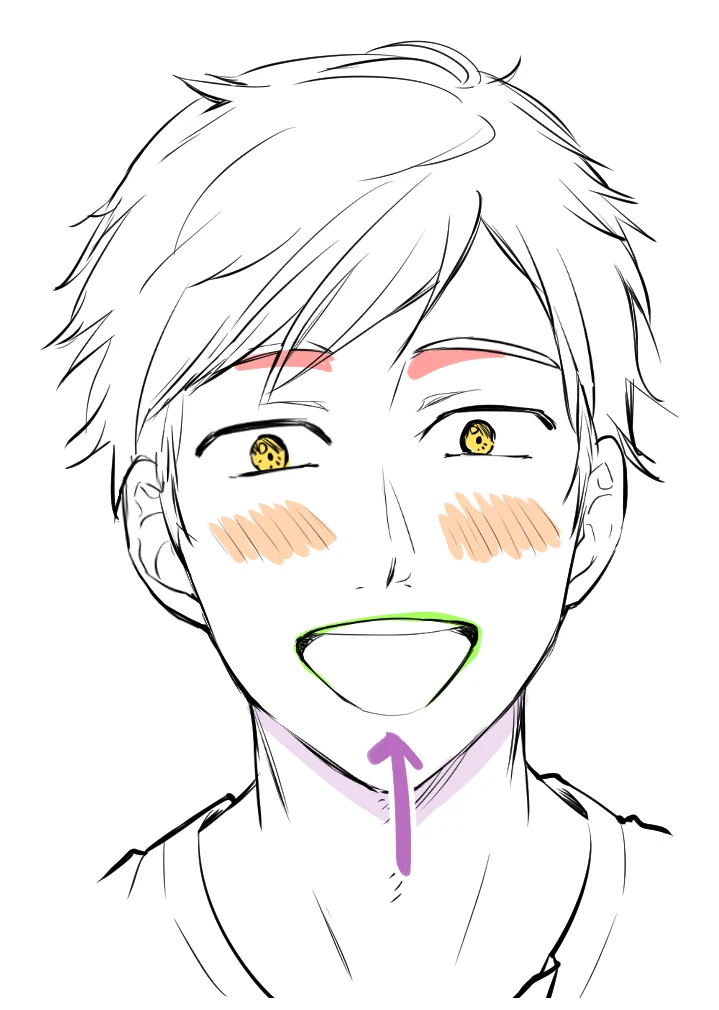
Push every part further: high brows with low tails, small eyes, flushed cheeks, a wide-open mouth and a face turned up.This is the shonen "we did it!" face. In red, the eyebrows go way up to stress the joy. Keep the brow tails down here: that's what makes the happiness read as honest and open. In yellow, the eyes. The lesson draws them small, which pushes the feeling even further.
In orange, diagonal lines show the face flushing. In yellow-green, the mouth corners go up while the mouth opens wide, and that big opening says the joy is big. The purple shadow and arrow show the face turned upward. The bigger the movement of the neck and body, the stronger the emotion reads.
Real lesson material
Same joy, different strength
Both of these characters are happy. The gentle smile changes only a little. Full joy moves the brows, the eyes, the mouth and even the head.
A gentle smile: small changes to the brows, lower eyelids and mouth.
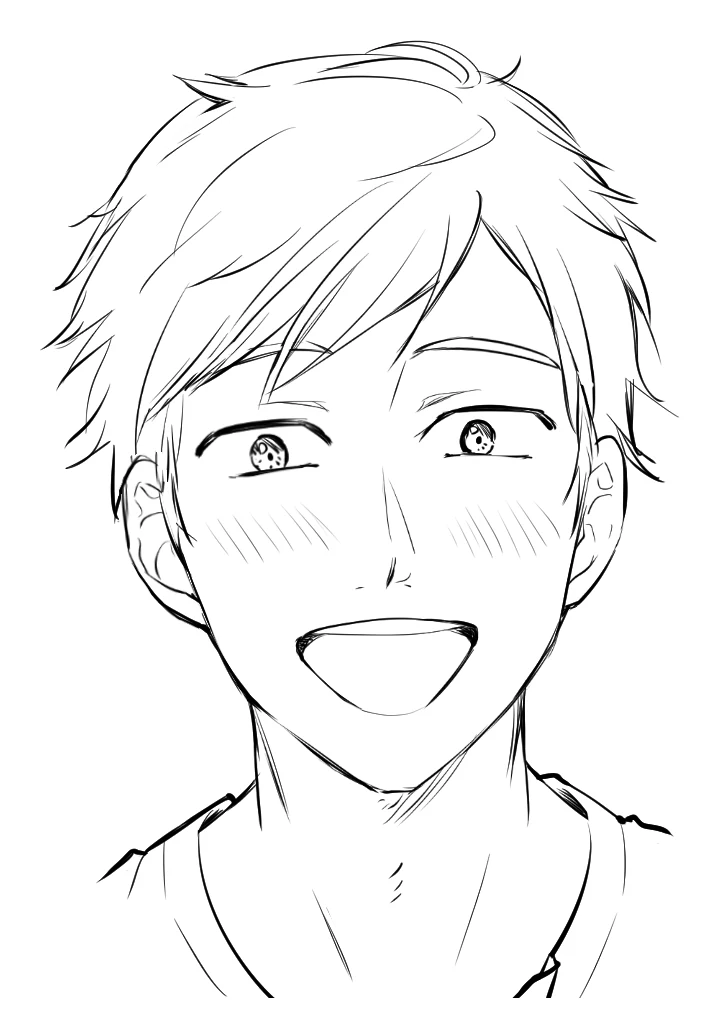
Full joy: high brows, small eyes, a wide-open mouth and a face turned up.
Where people usually get stuck
My smile looks creepy or forced.
Usually only the mouth is smiling. Raise the lower eyelids, curve the eyes into crescents, and let the brow tails drop. A smile starts in the eyes.
All my happy faces look the same.
Change the strength, not just the face. A gentle smile moves the brows and mouth a little. A big smile lifts the brows higher and moves the neck. Full joy opens the mouth wide and turns the face up.
When I close the eyes, it stops looking like a smile.
Closed or narrowed eyes still need the crescent curve. Draw them as an arch that bends up in the middle, like the laughing girl in Step 04.
Happy anime expression FAQ
What is the most important part of a happy anime face?
The eyes. When a person smiles, the muscle under the eye relaxes and the lower eyelid rises, so the eye turns into a crescent. Add brows that rise with their tails dropping and mouth corners that lift, and the face reads as happy even in a one-line sketch.
Why do anime characters have diagonal lines on their cheeks?
The lines show a blush. The habit comes from the days when most manga were drawn in ink only, and artists used hatching lines to show darker and lighter tones. A flushed face makes joy look stronger.
Which face muscles make a smile?
Two areas do most of the work: the lower part of the orbicularis oculi around the eye, which relaxes so the lower eyelid rises, and the zygomaticus major in the cheek, which pulls the corners of the mouth up. Other muscles shape the rest of the face, such as the frontalis that raises the eyebrows and the corrugator that pulls the brows together.
How do I get feedback on my facial expression drawings?
When you join an Anime Art Academy course, a professional Japanese artist gives you personal advice and draws red-line corrections directly on your drawing. There is no limit on how many times you can submit. The only rule: post one drawing at a time, and wait for your teacher's reply before posting the next.