How to Draw Hips, Thighs and Legs for Anime Girls: A Step-by-Step Guide by Japanese Pro Artists
If your character's legs always look glued onto her hips, start here. These construction studies use faceless drawing mannequins, so you can focus on structure. Try each check on your own character before adding clothes or shading.
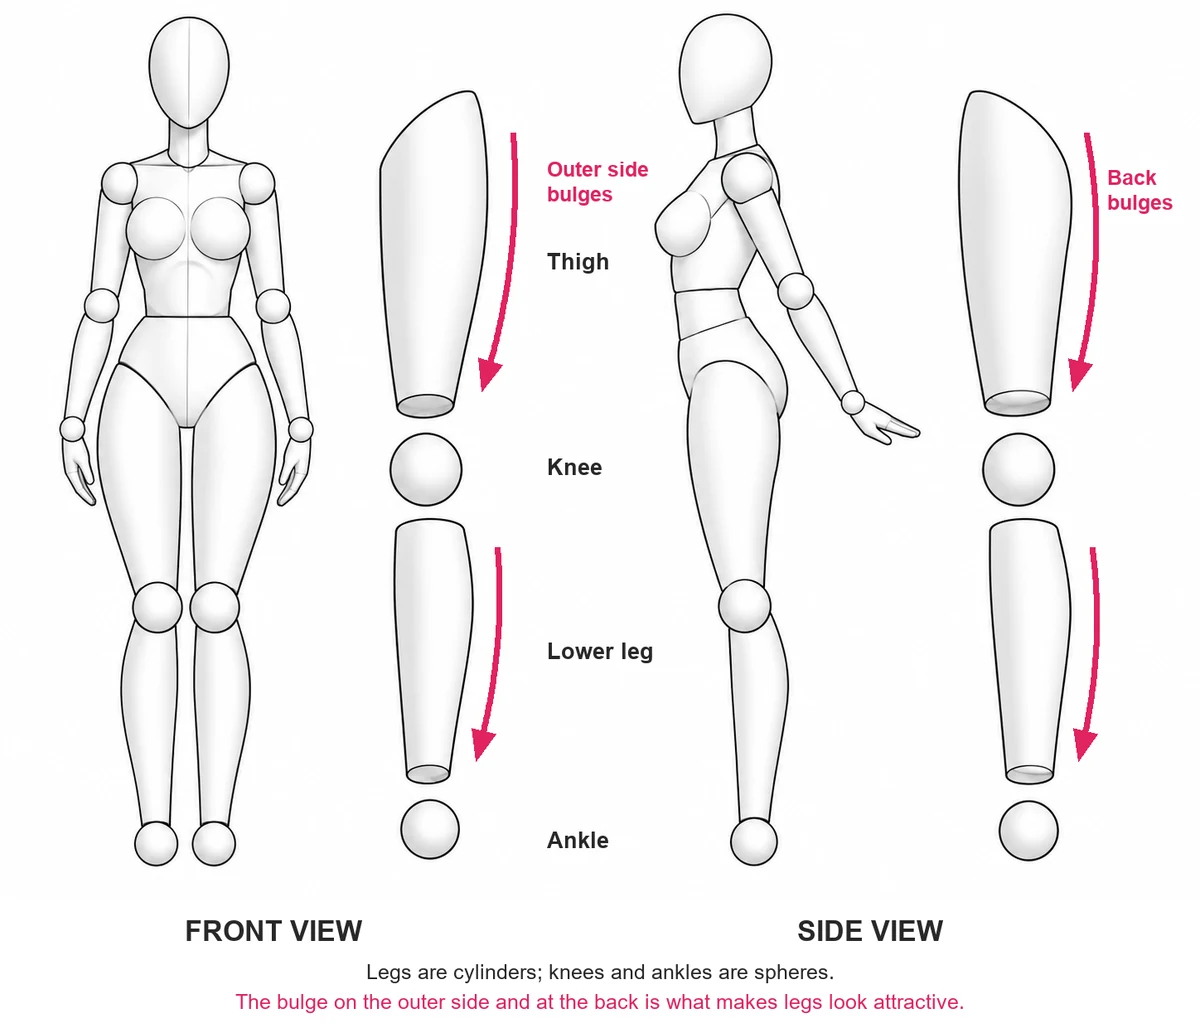 Construction study
The five stages at a glance
 01
01
 02
02
 03
03
 04
04
 05
05
Step 01 · Pelvis as a box
Where do anime hips start?
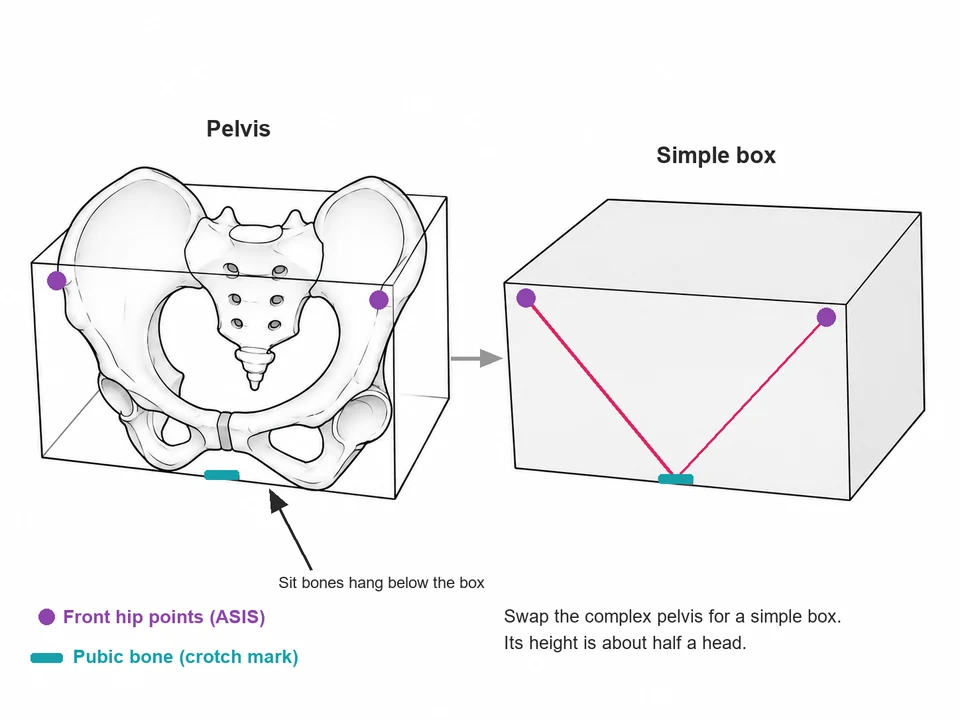
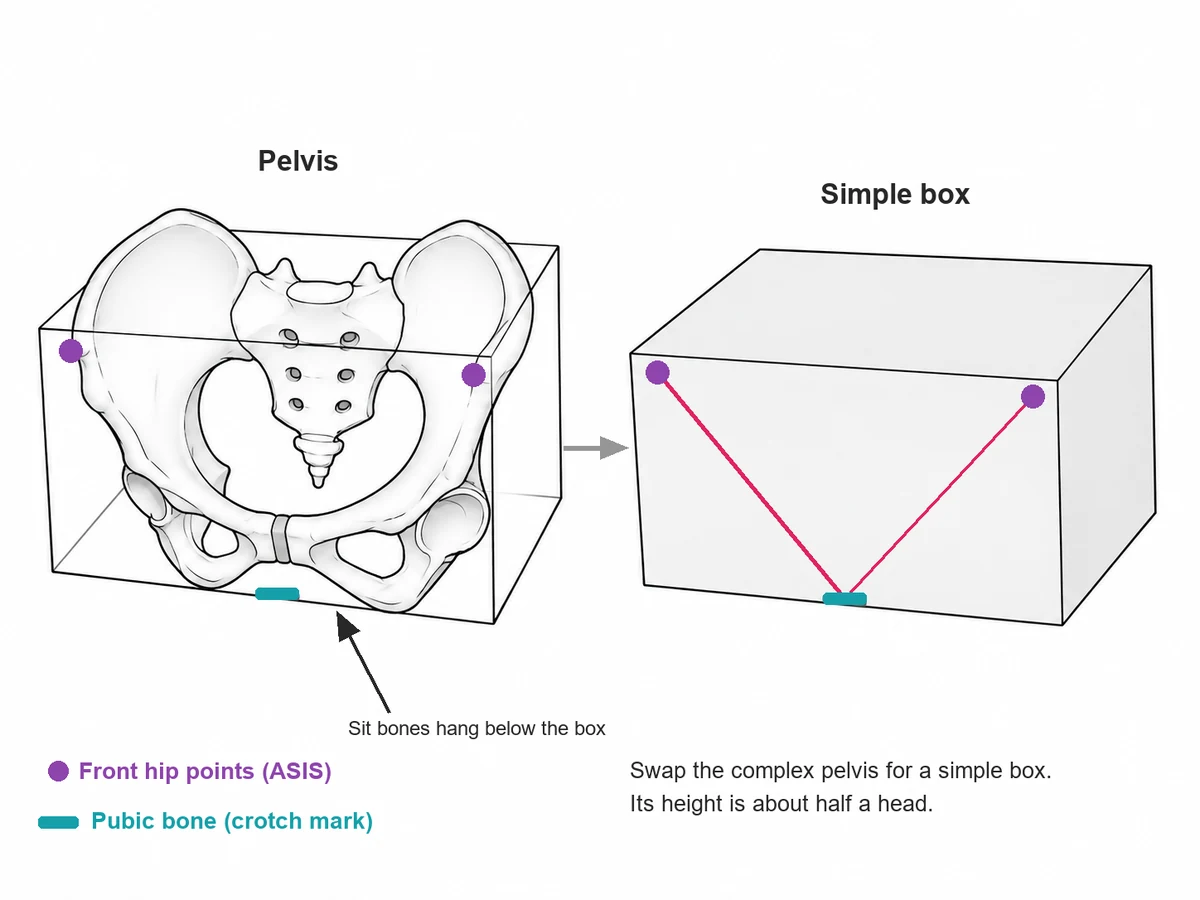
With the pelvis, simplified into a box.The pelvis is a complicated bone, but you don't need every bump of it to draw a character. Replace it with a box and keep three landmarks: the two bony points at the front of the hips (you can feel them on your own waist), and the pubic bone, which marks the crotch.
Draw a line from each front point down to the pubic mark and you get a V on the front of the box. The box is roughly half a head tall. The sit bones hang just below it, and they decide where the buttocks rest when she sits. If a box feels stiff, a bucket shape works too.
 Construction study
Step 02 · Hip thickness
How do the hips connect to the legs?
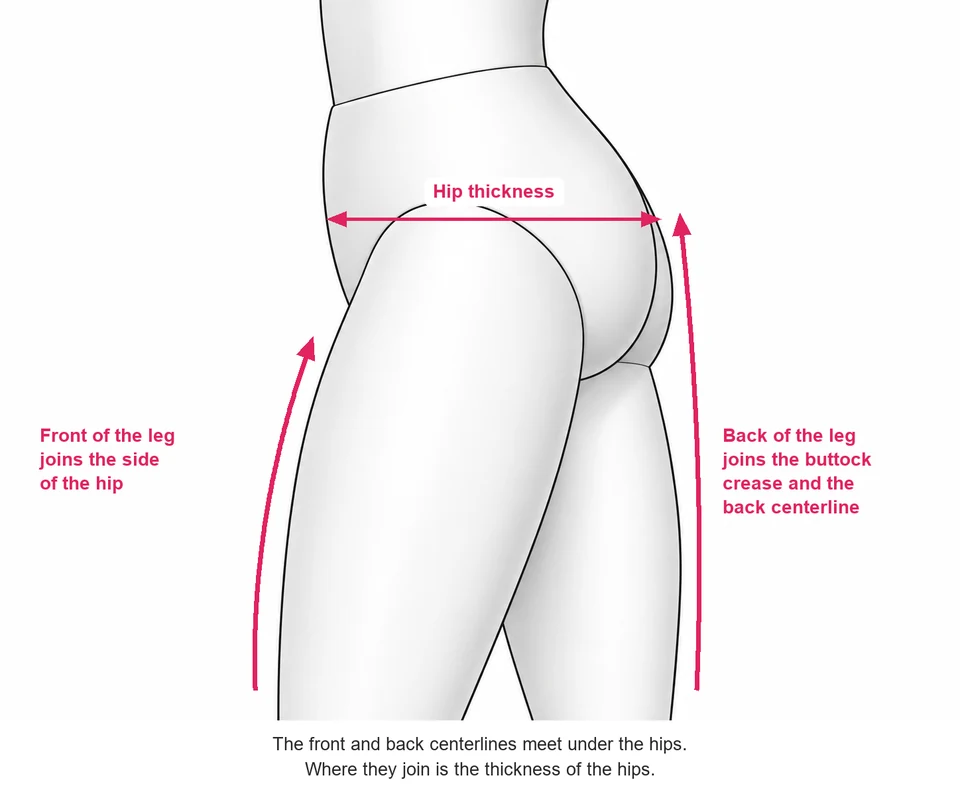
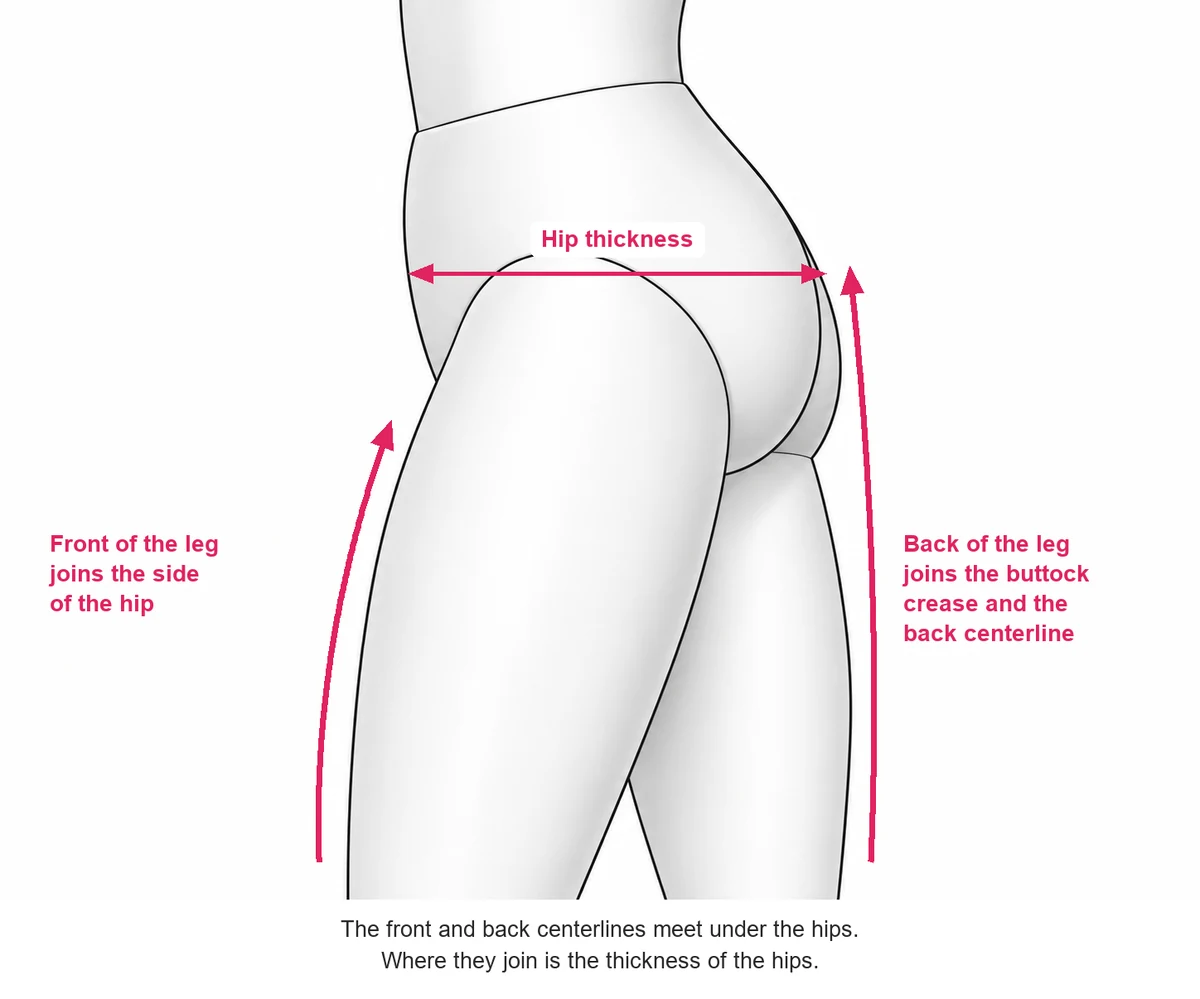
Follow the centerline from the front, under the crotch, to the back. That loop is the hip's thickness.The front centerline runs down through the navel to the crotch, passes underneath, and comes out at the buttock crease to join the back centerline. Where the front and back lines meet is the thickness of the hips, and the side view shows it best.
The front of the leg joins the side of the hip. The back of the leg runs into the buttock crease. Keep those two connections in mind and the legs stop looking pasted on.
 Construction study
Step 03 · Waist-to-thigh ratio
How wide should the hips and thighs be?
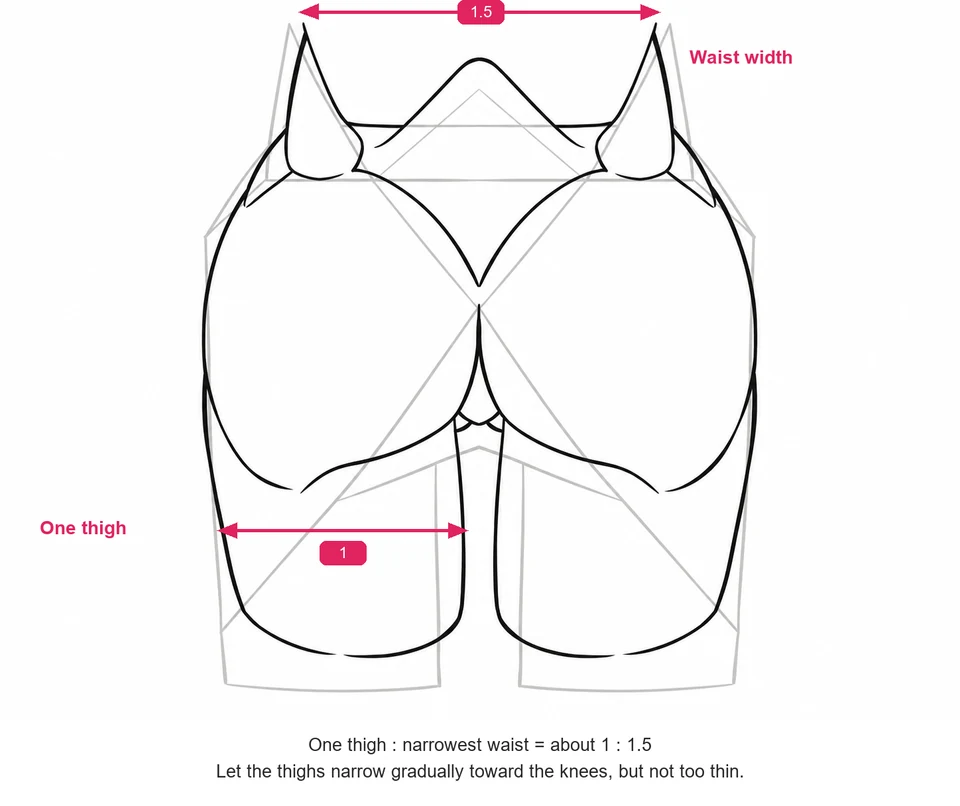
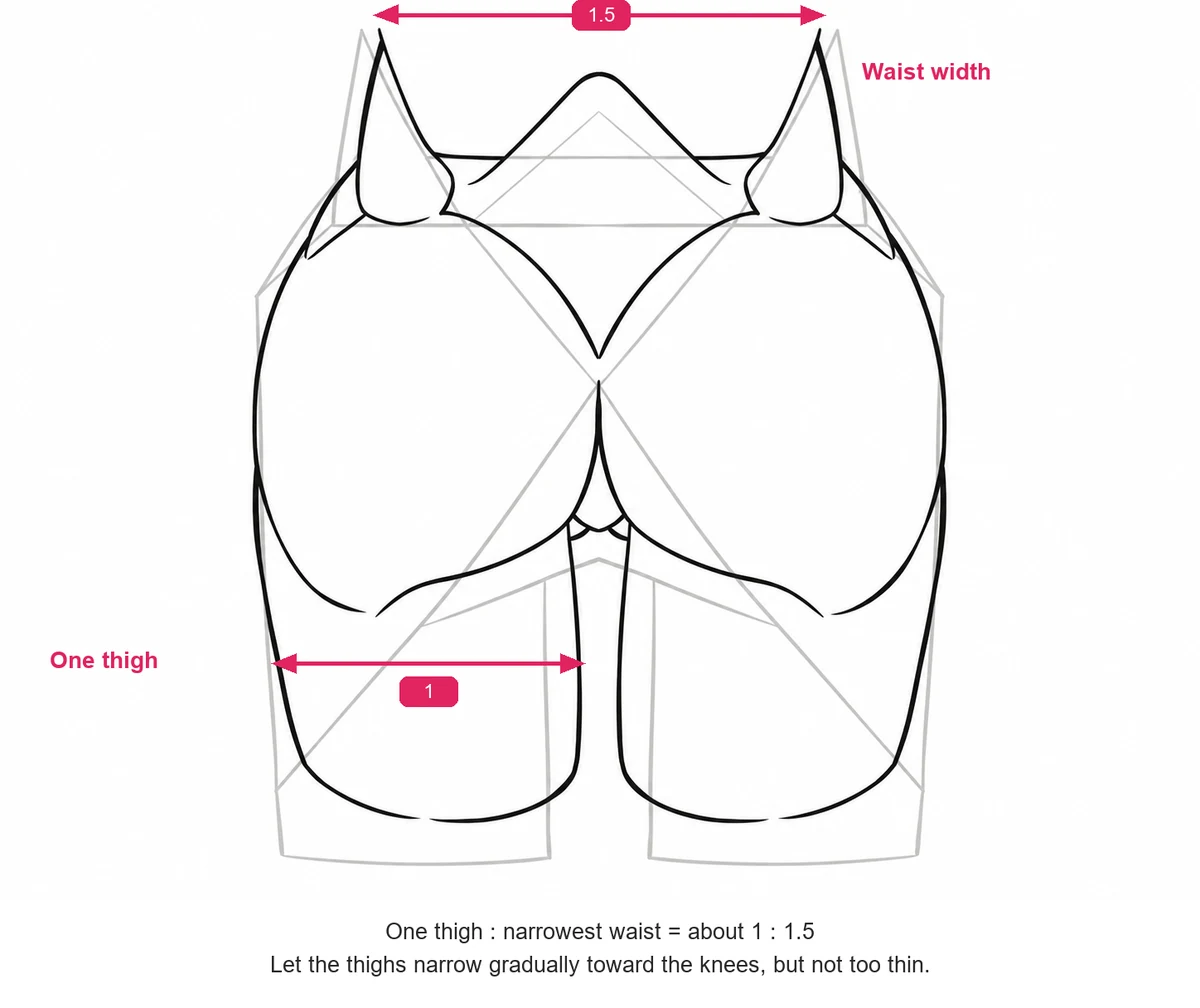
Make the narrowest part of the waist about 1.5 times the width of one thigh.Even for a soft, curvy figure, start with a square block. Split it with an X: the center of that X becomes the buttock crease. The two pointed shapes at the top mark how wide the waist is.
Now compare one thigh with the narrowest waist: about 1 to 1.5. From there, let each thigh narrow gradually toward the knee. Squeeze them too thin and the lower body loses its weight.
 Construction study
Step 04 · Thigh construction
How do you draw anime thighs from the front?
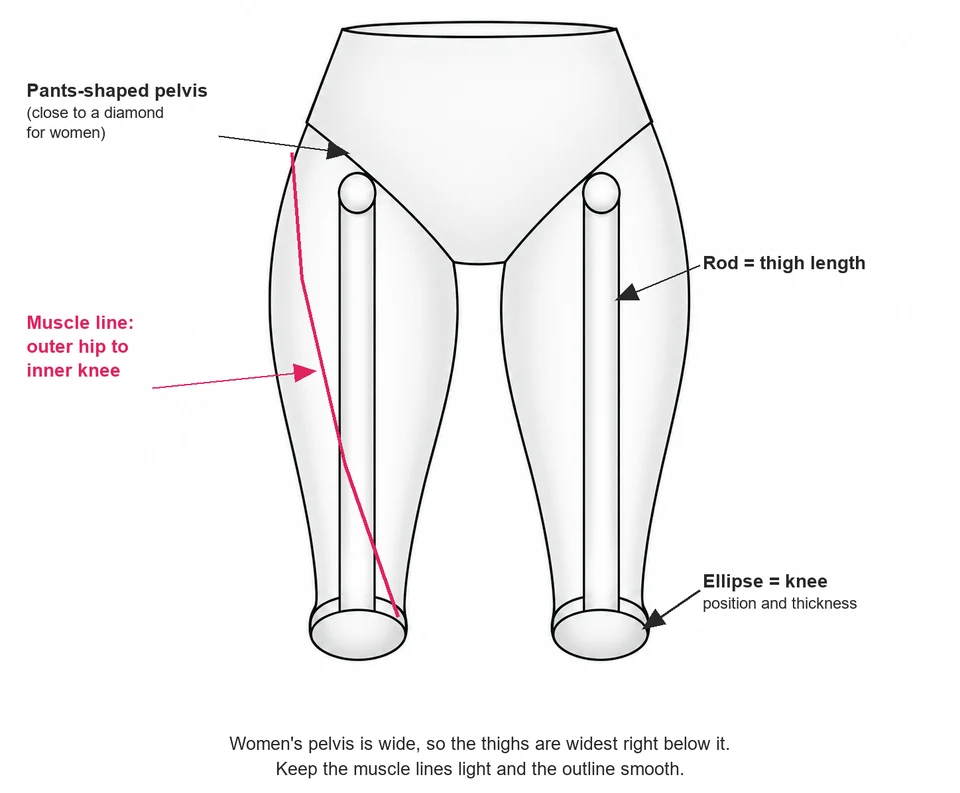
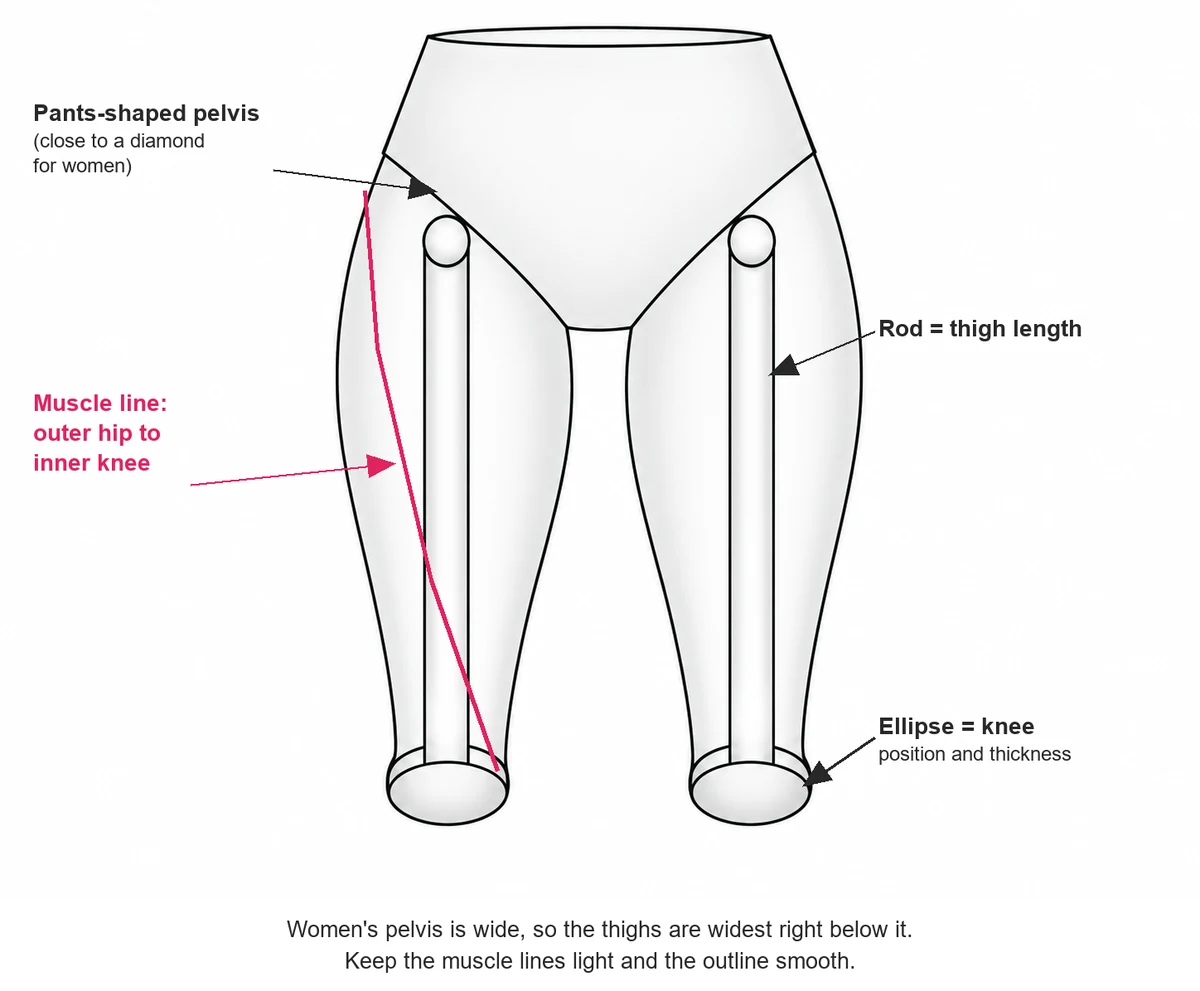
Turn the pelvis box into a pants shape, set the length with rods and the knees with ellipses.Draw the pelvis like a pair of briefs. On a female figure it is wide, close to a diamond. Add a rod for each thigh bone to set the length, then an ellipse at each knee to fix its position and thickness.
Flesh it out with smooth lines. A line running from the outer hip to the inner knee gives the thigh its direction. A woman's thigh is widest just below the pelvis, so keep the muscle detail light and let the outline stay soft. Seen from the side, the thigh is about half the length of the upper body.
 Construction study
Step 05 · Hips in motion
How do the hips change when she moves?
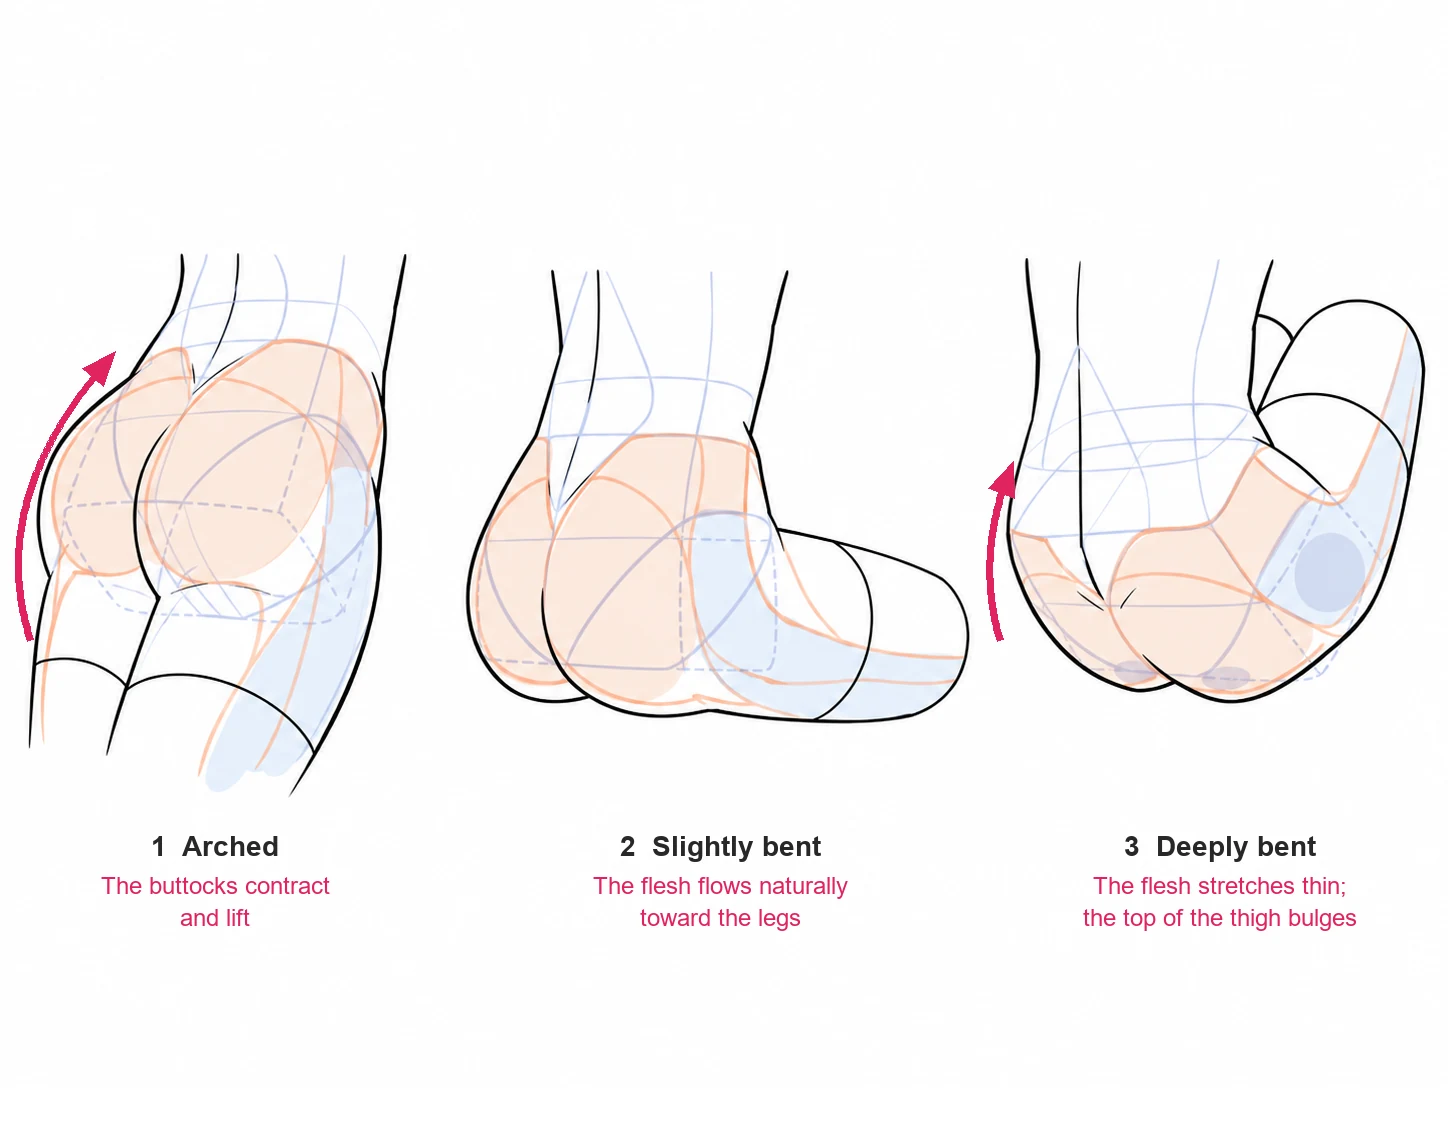
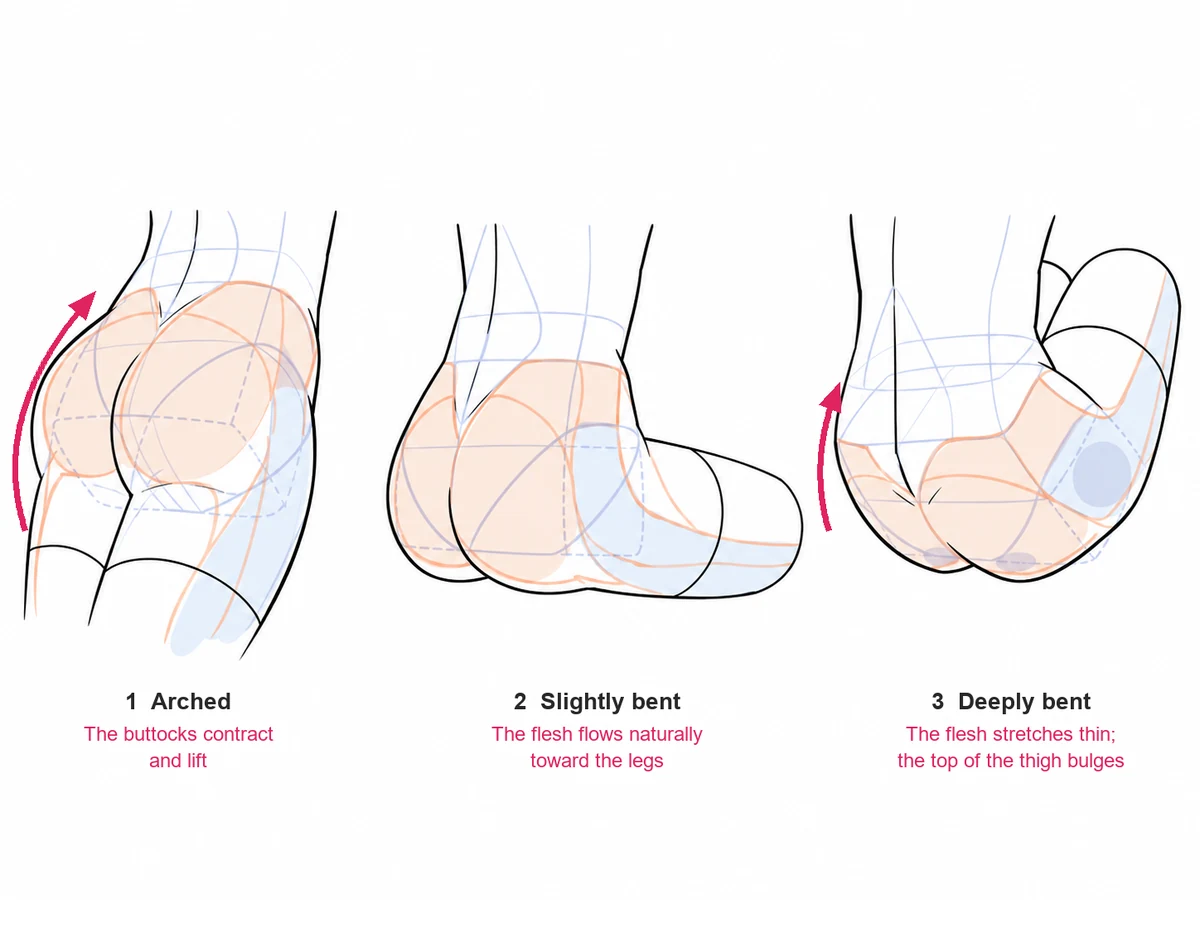
Learn three basic shapes: arched, slightly bent and deeply bent.When the back arches, the buttock muscles contract and lift. When the leg bends a little, as in sitting, the flesh flows naturally toward the legs. When the leg comes up high, the flesh is pulled thin and the top of the thigh bulges.
Most poses mix these three shapes. One thing to remember: the hip joint swings far forward but barely backward, so when a leg kicks back, the whole pelvis tilts forward with it.
 Construction study
The most common mistake: a torso that's too long
In an arched pose it's easy to stretch the waist without noticing. Keep the rib cage and the pelvis close together, even when the back bends.
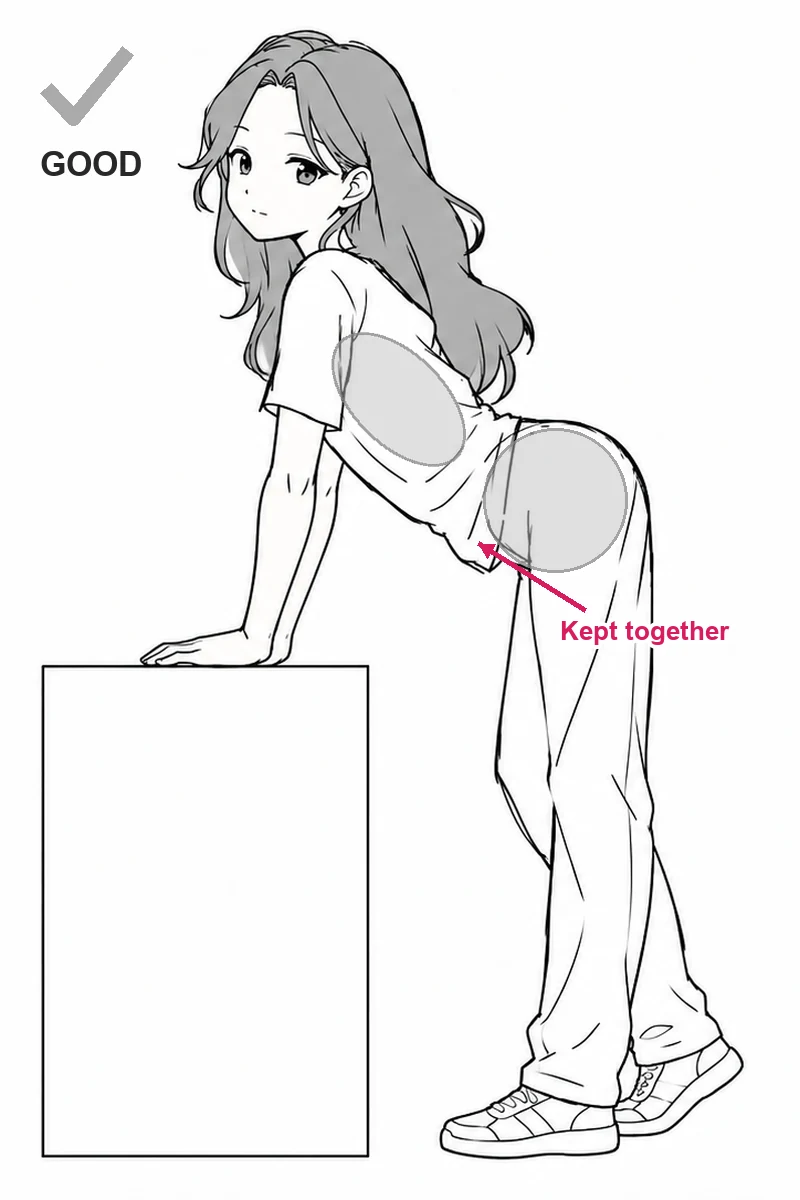
Good: the rib cage and pelvis stay close together.
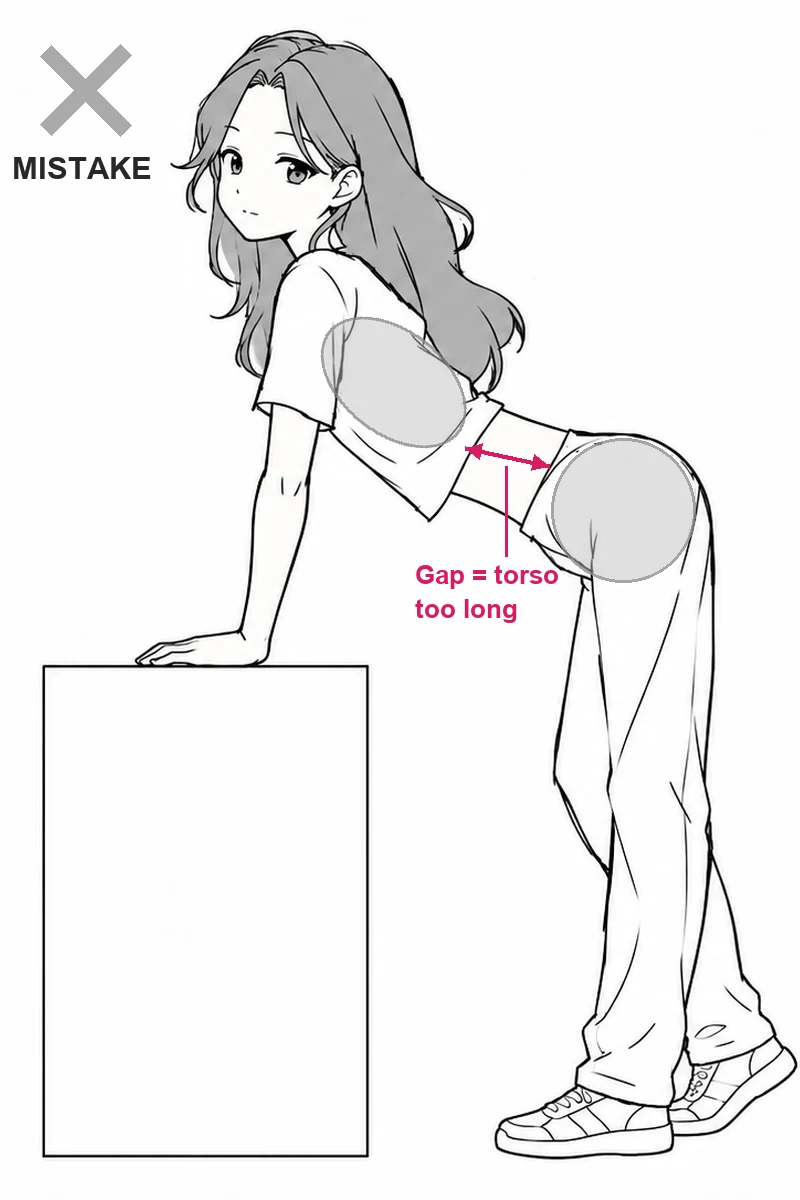
Mistake: they drift apart and the torso gets too long.
Where people usually get stuck
Why do my hips look flat or boxy?
The box is only for placement. Once the pelvis sits right, erase the guide and draw rounded contours over it. Then check the side view: the hips need depth from front to back.
Why do the legs look pasted onto the body?
Connect them properly. The front of the leg joins the side of the hip, and the back of the leg runs into the buttock crease. Draw the centerline loop under the hips first.
Why does my character's torso look too long?
The rib cage and pelvis guides have drifted apart, which happens a lot in arched poses. Keep them close together even when the back bends.
Anime hips, thighs and legs drawing FAQ
Can I practice these studies with pencil and paper?
Yes. Use light lines for the pelvis box, centerlines, rods and knee ellipses, then darken the outline once the placement works. A tablet is optional; the construction checks are the same.
Should every anime girl have the same hip and thigh shape?
No. Hip width, thigh thickness and curves vary from character to character. The ratios in this guide are a starting point for a balanced figure, not a rule for every body.
How do I draw anime hips from the side?
Give the pelvis box depth, round the buttocks at the back, and make the thigh about half the length of the upper body. The front of the leg joins the side of the hip, and the back joins the buttock crease.
How do I get feedback on my body drawings?
When you join an Anime Art Academy course, a professional Japanese artist gives you personal advice and draws red-line corrections directly on your drawing. There is no limit on how many times you can submit. The only rule: post one drawing at a time, and wait for your teacher's reply before posting the next.